Simple Transitional Exercises You Should Do Post Inversion Therapy
I just want to let you know beforehand, that the post inversion therapy transitional exercises presented in this article are not compulsory. Of course you can gain a ton of healthful benefits from performing various inversion therapy exercises and stretches shared throughout this website* without doing these transitional exercises. However, if you wish to make the most out of your inversion therapy program, then I strongly recommend you do them.
*Note: Check out the links below to access instructions for performing a wide range of exercises and stretches on your inversion table.
Read More: How to do Morning Stretches on Your Inversion Table
Read More: How to Spine Alignment Stretches
Read More: Stretches to Energize the Spine
Read More: Relaxing Inversion Therapy Table Stretches
Read More: Inversion Stretches for Strengthening the Whole Body
Read More: Challenging Inversion Stretches
Read More: Back Nurturing Inversion Table Stretches
Read More: Additional Inversion Therapy Exercises That Are Highly Beneficial
As the title indicates, these transitional exercises should be done after you have completed your inversion therapy table exercise and stretching routine for the day. The exercises are very simple and they won’t take too much time to complete.
Begin with the Prayer Squat
Prayer Squat
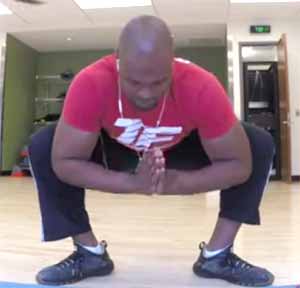
I read in an article that some people can actually stay in this position for hours while they meditate! You may not want to take that option, but with practice, you will find this posture to be a relaxing and focusing position. It will also alleviate low back pain, relieve sciatica, open the hips, improve balance, strengthen the ankles and feet, and help create poise.
1. Dismount from your inversion therapy table, take a couple of deep breaths, crouch down and allow your hands to rest flat on the floor. You hands should take up position between your feet, and heel-toe the feet open to wider than hips’ width.
2. Bend knees deeply and drop the tailbone down. Brace your arms against the insides of your knees and bring your hands into the prayer position as shown in the picture above.
3. Now simply breathe and release into this prayer squat pose. Let your tailbone continue to drop, and keep pressing your arms against your legs, opening them further as you sink deeper.
4. Close your eyes and relax for five to ten breaths, or longer if you prefer.
Transition to Seated Forward With Crossed Legs
Fall back onto your butt and bring your legs into comfortable cross-legged position as shown in the image below.
Seated Forward With Crossed Legs
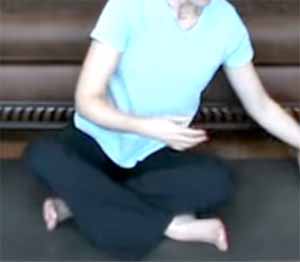
Be very careful not to force this move. If you’re especially tight or tense, this may feel uncomfortable at first, so always listen to your body. Use your breath and gravity to help you ease into the pose. Give yourself time and remember that with every practice, you’ll melt deeper into it.
1. The first thing you must do is ensure you are able to truly feel your sitting bones, and extend upward through the spine and all the way out through the crown of your head.
2. Keep your shoulders directly over your hips, and then extend your arms overhead, reaching through all ten fingertips. Make sure your shoulders drop down, away from your ears.
3. Inhale and feel your rib cage lifting up off the waistline.
4. Exhale and hinge at the hip joints, continuing to extend through your fingertips as you slowly fold forward.
5. Go as far as you can, keeping your spine long, then round down and let your hands rest on the floor. If possible, bend your elbows and let your forearms rest on the floor.
6. Let go of tension in the head and neck, and soften the shoulders and the middle back. Continue to breathe slow, even breaths, relaxing deeper with each exhalation.
7. If your arms are long and extended, you can gently walk your fingers forward on an exhalation and work the pose deeper.
8. Continue to relax and breathe for five to ten breaths, then slowly come back up or go into the next pose.
Transition to Head-to-Knee Movement
Head-to-Knee Movement
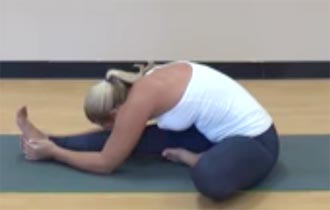
This exercise can open up the chest and lungs; improve your digestion; increase your circulation to the liver, kidneys, and colon; alleviate headaches; and strengthen your low back. Also, are you interested in getting rid of anxiety, stress and even mild depression? This movement can certainly help you get rid of them.
1. From a cross-legged position, extend your right leg straight along the floor and press the sole of your left foot up against your right inner thigh. (If this feels uncomfortable, you can rest your foot lower on your right leg.)
2. Turn your torso to face your right leg and extend your arms forward. If you can reach your foot, then hold on to it.
If you're not quite there yet, hold onto your leg wherever feels comfortable. You should be challenging yourself but not forcing the stretch.
3. Inhale and lengthen up through your spine; then exhale and extend your torso forward, leading with your heart center.
4. If you are able, let your forehead rest on your shin. You can also modify the stretch by bending the knee of your extended leg and letting your belly rest on your thigh.
5. Breathe and release any holdings or tension with every exhalation. Feel yourself completely let go.
6. Hold for three to ten breaths. Then slowly come back up and repeat to the other side.
Bring legs together and shake out.
Transition Complete!
Moving Forward Sequence
What could be more relaxing than rolling forward into a ball? For many experienced inversion therapy patients, the above transitional exercises, and other forward-type bends are the most restful post inversion therapy exercises of all. To make these transitional exercises work for you, keep in mind that forward bends allow the back to stretch, releasing tense muscles. While relaxing into all the exercises is a wonderful thing, you will also want to focus on feeling your body use the poses performed for the exercises in a purposeful manner.
