2 Challenging Stretches That Can Be Done on an Inversion Therapy Table
Inverted Backbends are, to many inversion therapy newcomers, the toughest stretches to do and the most intimidating, which is a shame, because if you sit at a desk all day or drive in a car a lot, you will probably eventually develop a forward bend in your back which can really wreck your posture. Therefore, backbends are highly beneficial to anyone who sits a lot, and the variations provided on this webpage aren’t very strenuous. This is a great series to do after work or after a long car ride.
More Inverted Backbends
These inversion stretches are a little more challenging. You can feel free to mix and match them with the simpler one presented here, or you can leave some out and then add in more difficult stretches every time you practice or whenever you feel you are ready for more work. Backbends create an abundance of energy throughout the body.
They also relieve stress, do wonders for your posture, tone the muscles of the back and spine, and improve digestion and circulation. Always remember to keep your breath flowing, as there is a tendency to hold the breath. It’s important to focus on continuing to move the oxygen and blood through the muscles.
(1) Inverted Backbend with Crossed Leg
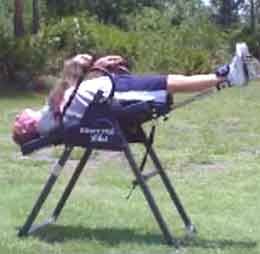
This Backbend variation allows you to increase the stretch in your hips and legs, while releasing your abdominal muscles.
1. Lie on your inversion table and place both feet on the table’s foot platform, keeping them parallel and hips width apart.
2. Cross your left ankle over your right thigh, making sure that your ankle bone clears your thigh.
3. Inhale and press into the sole of your right foot as you lift your hips up. Engage your right hamstring and gluteal muscle to lift you higher.
4. You can roll your shoulder blades together and bring both arms underneath your body, interlacing your fingers, or simply keep your arms at your sides.
5. Hold for three to five breaths; then slowly come rolling down through the vertebrae. As soon as your tailbone touches the surface of the table, lift up your left foot, then grab hold of your right thigh and exhale as you pull your legs toward your face. Press your left elbow into your left thigh for a deeper stretch. Hold for three to five breaths and feel your right hip and left hamstring opening and lengthening.
6. Gently release, lowering legs to the foot platform; then uncross and repeat to the other side.
(2) Full Inverted Bridge
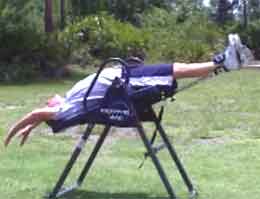
The Inverted Bridge stretch will improve flexibility in the spine and shoulders and open up the chest and neck as it increases lung capacity. It will also help stimulate the central nervous system, the thyroid, and the parathyroid glands; relieve high blood pressure, asthma, and sinusitis; help with digestion; and reduce fatigue. You can see why this is a good stretch to practice every day!
1. Lie on your inversion table and place both feet on the foot platform, keeping them parallel and hips width apart.
2. Keep your spine neutral, creating a natural curve. Inhale and press into the soles of your feet as you lift your hips up. Feel yourself lengthening through the tailbone and extending through your pelvis, straight through your knees.
3. Use the powerful lower-body muscles—your glutes, quadriceps, and hamstrings—to propel the hips higher, then roll the shoulder blades together and bring both arms underneath your body, interlacing your fingers.
4. Continue to press into your feet and keep your knees parallel (think about pressing a block between the knees—this is the correct knee position). Hold for three to five breaths.
5. Unclasp your hands and bring them to your sides. Slowly draw your navel in and curl your pelvis as you roll down very slowly. Take your time and feel each vertebra as you roll down, giving yourself a gentle massage.
