Warm Up Techniques Before An Inversion Therapy Session
One of the most common spots to hold on to tension is in the upper back and shoulder area and into the neck. These simple stretches will work best in conjunction with deep, flowing breath. Be conscious of releasing pent-up aggravation and stress with every exhalation. All of the stretches listed here can also be performed seated, and you can include any or all of them in your warm-up right before you do your regular inversion therapy exercises and stretches.
The Wall Pose Technique
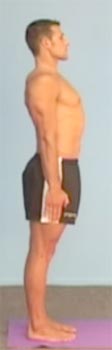
The wall pose is deceiving— it looks like there’s not much going on, when, in reality, the entire body is engaged. Regular practice will help develop focus and willpower. It brings the spine into alignment; tones the abdominal and gluteal muscles; opens up the heart center and improves posture. This pose is also good for strengthening your ankles, knees as well as thighs.
1. Stand with your feet together, arms at your sides with your palms turned forward. Let your knees face forward and stack them over your ankles. Then stack your hips over your knees, scooping your pelvis forward, letting your tailbone turn downward.
2. Contract your abdominal muscles and lift gently through your heart center. Stack your shoulders over your hips and then draw your shoulder blades together and slide them down your back.
3. Close your eyes and bring your awareness into the soles of your feet, feeling them root into the earth. Inhale and draw the arches of your feet up and lift your kneecaps. Feel the energy moving through your core and into your back, and make a conscious effort to extend your spinal column as you reach out through the crown of your head. (Imagine there’s a string attached to the top of your head and someone is pulling on it, causing your bones and muscles to extend upward.)
4. Hold the pose for three to five breaths, continuing to extend your entire body—keeping feet rooted and energy extending through the crown of your head.
Basic Arms Stretch Technique
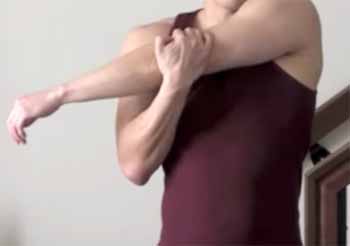
To gently open up the deltoid muscles.
1. Bring your feet to hips’ width apart and slightly bend your knees. Cross your right arm in front of your body and cradle your right elbow in your left hand.
2. Gently press your right arm as you drop your shoulder down. Breathe deeply and let go of tension in your arm.
3. Hold for three to five breaths, and then repeat to the other side.
Gentle Side-to-Side Twist
Gently awaken the spine and begin to energize the body
1. Standing with your feet hips’ width apart and with a slight bend in your knees, let your arms hang loosely by your sides.
2. Begin to focus on your breath and then slowly begin to twist your torso from side to side.
3. Let your arms be free as you continue to inhale and exhale, moving from left to right.
Ear to Shoulder/Chin to Shoulder

Stretch the neck and let go of tension.
1. Standing with your feet hips’ width apart, pull your navel in, and turn your tailbone toward the floor.
2. Keep your shoulder blades drawn together and moving down toward your butt.
3. On an exhalation, gently let your head fall over to the right, letting your right ear drop toward your right shoulder. Don’t force it in any way—just let go of the weight of your head and keep your breath flowing evenly.
4. After two or three breaths, turn your chin toward your right shoulder and set your gaze down at the floor. Feel the stretch in the left side of your neck.
5. On an exhalation, drop your chin to center and let the back of your neck extend naturally. Breathe.
6. After two or three breaths, roll your head over to the left, letting your left ear fall toward your left shoulder.
7. Hold for two to three breaths, then turn your chin toward your left shoulder and stretch the right side of your neck. Breathe.
8. Continue rolling your head from left to right, then right to left, repeating the sequence two or three times.
9. From center, bring your head upright and go right into the next move.
Comfy Shoulder Rolls
Loose up tight shoulder joints. This should feel like a great shoulder massage!
1. Standing with your feet hips’ width apart and knees slightly bent, make sure your hips are stacked over your knees and your shoulders over your hips.
2. Let your arms hang loosely by your sides, then move with your breath as you inhale and lift your right shoulder up (like shrugging your shoulder).
3. Exhale and roll it back and down.
4. Repeat to the other side.
5. Continue to roll opposite shoulders up and back for several rounds; then hold at center and reverse the action.
